Wednesday, March 31, 2010

Rock A Bye Baby

J's Nursery Chair came in last week!!!

I went forever ago and picked out three choices for upholstery, 2 good and 1 best of the worst, and she picked my FAVORITE!!  A velvety textured fabric.  LOVE!!


She coerced  asked her husband to put it together Friday night and it is perfect!!  The  color - everything.
OH - and she got a fluffy chocolate rug!!!  It will all make sense in the end - and her crib is coming in any day now!!


I love how the colors in the pillows pull across to the curtains - but just you wait until the bumper and skirt are done - it's going to be perfection! SNEAK:

Thursday, March 25, 2010

New Blog - Venture - Excited!!

Indulge me for just a moment and go check this out...please!!

http://nutmegsclothing.blogspot.com

Thanks!!!

Tuesday, March 23, 2010

Etch a Sketch

Wow - how I loved my etch a sketch. Never got really proficient at it - but I'm looking forward to buying one for pepito...

Anyhow.

It has been on my to-do project list to do sketches of our old houses, 18th Ave & Forest, to replace the baby pictures (that were never meant for the living room anyway). Over the weekend I found some vellum paper in a stash and also a picture of 18th Ave. I decided that first nap was as good a time as any to start.

Originally
We fell in love with 18th Ave at first look....of the outside. The diamond windows were gorgeous, the front porch was perfect, and the yard was level and full of grass. It was days before we were able to see the inside because the floors were in the process of being redone but in our minds it was ours. And silly first time homebuyers, with no realtor buying a FSBO, offered full price because we were terrified of losing it. We learned our lesson, never again.

The first weekend after moving in - I wasted no time in getting up the holiday wreaths!
We moved in 5 days before Christmas I think and it was wonderful. Sam & my Dad even moved our Christmas tree! So many great memories from that house. Sam BUILT our porch swing and it was THE most comfortable swing I've ever sat in! Playing in the yard with the pups, working on projects in the massive building in the backyard, and just having fun being newlyweds.

Love the Fire Engine Red Front door! It was no small feat to paint it though - it was solid wood and weighed agizillion pounds.
Back to the task at hand. The sketch only took about 20 minutes! I still kinda wish I would've been able to find my marker paper, but it was a whole lot easier to copy the house with the vellum... And I'm still trying to decide whether to go over the whole thing in pen. I'm kinda scared to because what if I don't like it and then I have to start all over? But, I guess it would only take me twenty minutes to redo if I had to....

The large print in the center is not one of our houses, unfortunately. My brother got married on Jekyll and Sam & I took the historic home tour while we were there for the weekend. It was our just our favorite house out of all the ones we saw and we used to try and pick up prints from everywhere we went off. Now - we get magnets - much more cost effective...


So - pen or no pen? Any thoughts?

Monday, March 22, 2010

Mixing It Up

Sam decided that since it was rainy on Sunday and we couldn't do yardwork, we would spring clean instead. And apparently pepito agreed - he took 2 - 2hour naps for us and then played happily in the walker all day. Success!!

We managed to get the living room, dining room, kitchen, hall and our bedroom totally clean. Top to bottom. Steam mop included. It was a TON of work - but so worth it. There is nothing better than a super clean house.

And then when we got done for the day and pepito was in bed - Sam came back to me on the computer and said he wanted to switch around the living room. I was not so sure it would even work. But in the spirit of being a good wife and indulging him, I said ok.

This is the only full picture BEFORE of the living room and it had much improved since.
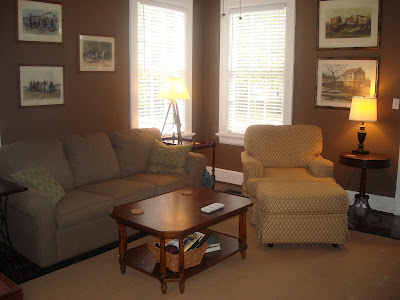
His reasoning was that our armchairs are way comfortable but we never used them because it was not a good tv viewing vantage point AND they were always covered in baby paraphernalia. It took about two hours of moving furniture, sitting, looking, talking about it, move some furniture, repeat...but we LOVE the end result!! And we don't have any truly orphan pieces, which is nice.

AFTER! We flip flopped the chair & sofa, lost the blue wing chair which created a nice little nook for all things baby and we put our smallest drum table to use as an 'accessory' piece by the fire place. The petite table from the dining room found a new home by the front door and is perfect for keys, wallet, and the occasional Diet Coke. ;)

In the grand plan, we are going to enlist my Dad to help us mirror the built-in bookcase, creating better symmetry. The secretary moved from behind the front door (where it was never really used) to by the sofa. Perfect spot for it too. We also decided to keep the blue frames (they were starting to bother me even though I wasn't done with the full vision yet) but put all of our prints to good use in them. Attic shopping anyone?! The ottoman from the wing chair even got to stay in the room - and now lives underneath the radio cabinet's drop down door.
The other side of the room, with the french doors, also got a bit of a makeover, but isn't put together enough yet to show...sorry. But, sliding the furniture down to center on the window instead of the bookcase created a lot more open space in front of the front door & french doors. (more space for pepito to run around in!)

Unfortunately, since we borrowed the little table from the dining room - I'm back to square one here. The good part - now pepito has much more room to toodle around in his walker. Plus, the table was getting beat down by the sun and that's no good.
I even made the bed this morning I was so jazzed about our new clean house.
This is the wing chair's new home - not perfect - but it'll have to do. It's so big, there's no where else it would even pretend to fit.
We didn't make it to spring cleaning the office, so excuse the mess, but this is where our pretty little antique green chair ended up. I kinda like it here even though it fit so well in the hall.

So - all in all - great mini makeover! We are tickled with the final result of the living room and are enjoying the cleanliness of spring cleaning!! I should've linked THIS up to Finesse Your Nest - oh well - the party's over now... This was the epitome of shopping your house!! A whole new look and not a dime spent!! (well, except that now I have to fix the dining room....ha!)

And I'm so proud of my husband for thinking outside the box and coming up with something brilliant!!! I know I married him for a reason!! (or hundreds...!)


Saturday, March 20, 2010

Sew Happy

I know, I know....I'm ridiculous. Since I finished my dress and need to go to the store to get supplies to begin to finish J's nursery items - I was left without a sewing project yesterday. Not cool. So I decided to create one. My spring wardrobe is seriously lacking because of my new mommy size, granted I still have to go attic shopping and see what I have up there to fit the bill, but using all my remnants (this top cost me under $3!!) to make a new top seemed like much more fun.
I had a yard of linen and a half yard of minty green small diamond print laying around that I thought MIGHT be enough to turn my dress into a top. And - luckily - I was right! I had JUST enough linen to make it work. Though, wouldn't you know, as soon as I had all the pieces cut realized that the linen would be SUPER see through. Again, luckily, I had some white thin polyester (maybe?) fabric remnant that I could use to line it.

Totally not in to the extra work the lining would create but it's better than giving everyone a show or having a tank top show through messing up the cute lines of the shirt. It was a bit more work and was definitely more difficult to work with but it makes all the difference. No peep show!!

I chose to eliminate the zipper, because I didn't have one on hand, and I was pretty sure that I could fit it over my head without one, and I also nixed the tie because I wanted to do ruffle collar and arm holes and didn't want there to be too much print. Somehow with the lining, the measurements got a little smaller, so there was no need to cinch in to make it fit. Sweet.

I finished up the ruffles this morning, I had run out of the off white thread, but decided that no one would be the wise if I used white bobbin thread. Plus, I REALLY wanted to wear the top to breakfast with the in-laws. My MIL always looks uber chic, seriously ALWAYS; all of my friends want to be her when we grow up. And I always feel like a puffalump in my yoga pants & tshirt next to her, so I really wanted to put some effort into myself this morning. And, honestly, I should do this more often. I felt so pretty and put together with cute outfit, makeup and my hair done. I even put on earrings and a wood bracelet. (wood bracelet specifically chosen so pepito could chew on it if he got bored with all of his toys. He's usually VERY interested in my jewelry...)

Anyhow. Here's the final top - and my sweet hubs forgot to mention that my strap is showing, but, for some reason, I'm unable to retouch it out... Guess I'm really just THAT pale! ha!

I have been seriously amazed at how easy it is to make clothes, baby and adult sized. I don't mean to go on and on about it on the blog, but I'm so excited to have "conquered" this and am hoping that some of y'all realize it's not such a daunting task. Try it!! Just pin the pieces and sew in a straight line!! Easy cheesey!

Now go enjoy the beautiful weather!!! Perfect for sleeveless cute tops!!

PS - Just linked up to Finesse Your Nest Shop your House Link Party - be sure to check out all the fun new projects everyone is doing! This project may not be exactly home related like all the others - but I did definitely shop my house (fabric bins) to make it - so I think it counts...sort of... My first Link Party!!! Yay!!

Friday, March 19, 2010

To Flower or Not to Flower

As mentioned last night - I made a mistake when trimming the hems on my dress and nicked the shoulder. boo. And truth be told, an excuse to be able to wear one of these adorable flowers is awesome. I've been making them and making them and never getting to use them for myself - silly!! Anyhow - back to the subject at hand. Fixing my dress.


So I made a bunch of flowers last night and Sam and I decided that all the blue flowers were too much - so I have two options for you. And be honest!! And please leave a comment!!! Input is absolutely essential on this one!!

First one - just two green flowers with covered buttons. Simple, easy, and covers my boo boo.

Second one - two green flowers with a mini blue polka dot flower. A little more something...


And sorry for the crazy looking pictures - it's really hard to take a picture of yourself with this huge awkward Nikon camera...

I would tell you which way I'm leaning but I don't want to influence the comments....though - I bet you could guess!

Thanks for the help in advance!!


Thursday, March 18, 2010

It's Done!!

And if you'll please excuse my less than perfect mommy body, mommy hair, and tired expression. ;)


And wouldn't you know that at the very end, while trimming the hems, I knicked the face fabric at the right shoulder. So now I've got to figure out how to hide the hand sewing... Would a couple blue polka dot flowers look odd up there? I'll mock some up and get a pick on here soon - I need help with this one!

Wednesday, March 17, 2010

Bring on the Spring

Last weekend I realized that Easter is coming up much sooner than expected and the thought of having to buy a dress put me into a panic. Having to spend money on a dress and the agony of trying to find one that fits - ugh. Not fun. And then, while taking a study break at Hancock Fabrics this weekend, yes, I am THAT dork, their 99 cent pattern sale inspired me. I could MAKE my dress! Save oodles of money, be cutesy spring just like I WANT it to be, and it would fit just right. (or close to just right - I'm not that good yet)

In addition to this pattern, I also came away with five others to try out in the future. How could I resist - saving upwards of $10 on each pattern!! Gold mine!!

So, I wandered the store, looking for the best fabric deal for color that would be flattering and weight that would be appropriate and found the prettiest emeraldy green for $1.95 a yard. Perfection! Light summer weight, slightly stretch, cotton in a color that all redheads look wonderful in. Cannot. Contain. My. Excitement.

As the accent - I couldn't resist navy polka dots. I love navy. I love polka dots. Easy choice. Especially since there was 1/2 yd remnant - 75% off. Seriously - it just keeps getting better.

First thing I did after my final was break into the pattern and start cutting out my size. I'm not sure I was home an hour before I went for it. Wait - first I did P90X with the hubs and THEN I started. So, maybe it was 2 hours. (by the way - Tony is the devil...)

I think I stayed up late sewing that night and it was surprisingly easy to manage. I always have a problem with pattern instructions. They never make a whole lot of sense to me but I figured it out and forged ahead. Got the dress stitched together, but without the right interfacing for the neck and armholes I had to stop. (still don't have the right interfacing...maybe I'll go search it out tomorrow)

And let me just give myself a pat on the back for sewing in the zipper. I have been TERRIFIED of zippers and feel absolutely ridiculous now because it was REALLY easy. Fear - Conquered.

Last night I cut the accent strips and today I stitched them on. And it is adorable.

I'm so proud of myself for (nearly completing) this dress. My wardrobe is a constant source of frustration with the new mommy body (enter P90X) and it's been hard to shop when I have literally tens of totes in the attic with beautiful clothes that used to fit. It's so fun to be excited about clothes again!

Run down of costs, approximately...

Green Fabric: $5
Polka Dot Fabric: $0.75
Zipper: $1.50
TOTAL SO FAR: $7.25
Still need to get the interfacing - but I'm hoping I can keep the total to around $10 - we'll see!

Compared to $40 for a dress from Target - Savings of $32.75!!! Now THAT'S something to be excited about!!

Tuesday, March 16, 2010

Bad Blogger

I feel bad for not really posting anything in awhile. The dream house post was a last ditch attempt during studying to allay my guilt. It didn't work. But, I took the final last night, made a B in the class, and have already started enjoying my two weeks off.

Last night I started my Easter Dress, J's nursery bumpers, and today I completed J's nursery window treatments. And I completely forgot to take a picture of them. Bad blogger again - I know. But they are super cute and I can't wait to see them up.

I definitely plan to have something real to update here soon. House related or not - I will have a real post for my favorite few who read this!

OOh - forgot about this - found a monogram vase at Goodwill three weeks ago for $1.31! And I love it even more because it took a project off my neverending and always expanding list! Now I just need some flowers...

Friday, March 12, 2010

The Dream House

I just realized I keep referring to our Dream House but some of you may have absolutely no idea what I'm talking about. So a quick tour is in order I think, and I'll spare the you the many before pics. Maybe another day, another post.

Forest Ave Originally 1926 - picture found at the library
Every surface in the house had to be touched. Every single one. Literally. We did some our selves, and hired some out. Because of the sheer amount of wallpaper stripping (every room) and painting - we hired someone and didn't regret it for a minute. We would've saved a bundle of money DIYing it but they did such an AMAZING job - fixing every little problem that arose.

taken on the first day we looked at it
Something else we learned - don't open up the walls (especially plaster walls) unless you absolutely HAVE to. You never know you're going to find and it usually isn't good. Just saying.

after all the exterior painting, gutters, etc. had been done
Not all of these pictures, in fact probably most, are not great quality. They were taken in various stages of light and doneness - don't hold it against me please... :)

view from front door
formal living room

living room to dining room to sunroom

dining room
sunroom
family room (tv)

downstairs half bath
breakfast room
kitchen, totally gutted
i hand polished this copper hood
oh how I miss this laundry room

upstairs landing

master bedroom

upstairs bathroom
the guest room
our office, upstairs

That's most of it. 3,400 square foot of loveliness. Truth be told though, I only miss it at holidays. I miss having the entire family over for Christmas Eve dinner. We are much happier in our house now and are enjoying turning it into our new dream house.

Hope you enjoyed the tour.


Sunday, March 7, 2010

Waiting Game

LOOK WHAT MY NEIGHBORS FINALLY THREW OUT!!

This beauty has been sitting on their front porch for weeks and I've been SOOO tempted to walk over there and make an offer. Good thing I didn't - they finally put in on the side of the road!!!

As soon as the sun went down, and pepito was asleep, I went over all stealth mode and grabbed it. Seriously - it's sturdy and HEAVY.

Project wheels are turning.... (I'm leaning towards a bench on the screen porch - real furniture out there - oh my!)

....I don't even want to know what the hubs is going to say about this...

Saturday, March 6, 2010

Fringetastic

On a whim, and because I desperately needed to do something that was for ME since I've been so busy sewing/reupholstering for everyone else, I decided to get the sewing machine BACK out of the closet and make a pillow for our bedroom. (poor sewing machine only saw the closet for about 16 hours, so don't feel too bad for it)

I waffled a bit on whether I wanted to reuse the 20" fills that I had to rip the seams of pillows I had custom made before the dawn of my machine or to use the 16x24" fills I got last weekend at IKEA that were "supposed" to be for our armchairs in the living room.

At some point I decided I wanted to reuse the fringe trim on the original pillows. I think seeing how it was sewn in originally made the whole process a little less scary to try. And then I guess I thought I didn't have enough of the cream fabric I wanted to use to make the 20x20" - I actually thought wrong - but decided to make the 16x24 and the measurement on the trim would work perfectly.

the original pillow made for our guest bedroom at the dream house
Or so I thought - I think I didn't stretch it enough as I went, and truthfully, some of the fringe fell off when it's stitching came a bit undone - but I ended up having to borrow fringe from the other pillow and now I'm to making just one pillow. That's fine. I wanted to be done by the time my parents dropped pepito off anyhow. Easy cheesey.

And now for my first pseudo how to. I think I took enough pictures - well I forgot the ones of just the fabric pieces.. oh well - those would be boring pictures anyhow.

For a 16x24 pillows I cut one piece at 16x24 and one at 16x 28. (the finished pillows hold their shape and fluff better if the cover is just a touch smaller) I want about a 3" overlap in the back. Then I cut the 28" piece in half. Fold over 1/2" and straight stitch on both 16x14" pieces. You could do a double fold hem - but I'm lazy and this particular fabric wasn't laying flat after pressing.

Then - pin the trim on the right side of the fabric with the fringe towards the middle. Sew all the around about 1/4" in - or where the stitching on the trim is. You don't want any of the loop stitch parts showing - so keep it close. I used an upholstery needle - it seems to handle the thicker things better.

Next up - pin one of your shorter 16x14 pieces, right side down, and sew its three sides. Repeat with other short piece. Cut the corners diagonally but don't hit the trim - it may not matter - but I imagined a huge fringe flying disaster. My corners turned out just fine just trimming the fabric a bit.

Turn inside out, stuff in the fill, fluff and you're done. I forgot to iron the seams, and it may have been relatively difficult with the trim sewn in, but it doesn't seem to matter with the finished product.

please ignore the lack of shams - Target has been out -
they must be psychic for more people than just us.
I was formerly terrified of sewing trim. Avoided like the plague, even though several pillows I've made would be more adorable with some kind of fun edge. Turns out it is super easy and I had absolutely no reason to be scared of it. So jump in and have fun - worst case scenario - you have to rip the seams and start over. And seriously, I don't think I've sewn anything to date that I haven't had to rip atleast a little bit. It's not so bad...

OK - Moral of the story - I am tickled pink with how the pillow turned out and proud of myself for conquering something that "scared" me.


LinkWithin

Related Posts with Thumbnails